
Case 1: ‘I recently updated my MacBook Pro. After this, I opened the MacBook and realized that almost all my photos from the Photos app had disappeared (years of photos). I don’t use iCloud and I don’t have a Time Machine back-up. How do I recover permanently deleted photos on Mac?’
Case2: ‘To make some space, I accidently deleted the Album in Photos on Mac containing over 300 pictures. Is it possible to recover deleted photos from the Photos app, including those that erased from the Recently Deleted Album ?’
Despite having powerful features and functionalities, complaints of photos loss from Mac computers is quite common. Your photos are undeniably important. Even the thought of losing them makes you uncomfortable. However, you may lose access to your precious pictures due to accidental deletion or some other system error. Addressing the issue, this post shares the workable methods to recover deleted photos from Mac systems.
You can apply the methods listed here regardless of the Mac or iOS you are using. Be it Apple Mac mini, iMac, MacBook Pro, or others, the solutions include all.
Why photos get deleted or disappear on Mac?
No matter how secure your Mac device is against physical and logical failures and breakdown, you can lose data on it. Besides, accidental deletion and technical factors, there are many other reasons as well that leads to photos loss. Here we have shared the common causes in detail, to help you prevent precious loss of photos from your Mac in future:
- Reset of Photos app on Mac without taking backup.
- Accidental deletion, plus if the ‘Auto empty Trash’ feature is on, it may lead to permanent loss of photos from Mac. So make sure to turn off this feature to prevent photo loss from Mac in severe cases. Read more on Mac Data Recovery after using ‘Delete Immediately’ Option
- Accidentally formatting the Mac storage drive, volume or any of its partitions that contain all the important pictures and other crucial data. Under such situations, data loss is severe and recovery is complex.
- Downloading unreliable programs and applications on Mac may bypass security features of the device causing disappearances of files. Always check for compatibility parameters before downloading any application on Mac.
- Downloading reliable apps but from untrusted site can lead to virus or system errors, eventually causing loss of data. Hence, make sure to download the apps from trustworthy resources and links.
- Mac malware are growing and circulating on Mac systems with speed. They are obviously one of the cause of Mac data loss, which includes your personal and valuable photos.
- Corruption is undoubtedly another common reason that not only puts photos and other multimedia files on risk but also reduces the recovery chances.
- Editing original image file and not its copy pose risk of photo loss from Mac. Imagine what if,thephoto-editing app or your system crashes suddenly. This can also corrupt the photos on Mac.
How to recover deleted photos from Mac [7 Best Solutions]
It’s always better to have backup of all your essential data to avoid data loss due to accidental deletion or other reasons. However, in case of no backup, when you lose your important pictures on Mac, you can easily restore them from the app itself. Just search for the missing pictures in the Recently Deleted album, select the ones you want to retrieve and save. In case you have permanently lost pictures from macOS hard drive or photos missing due to unknown reasons, use a powerful Mac photo recovery tool such as Stellar Photo Recovery for Mac. Also, Read Recover Deleted Files on Mac
Method 1: Recover deleted photos from Mac Trash Bin
Look for your deleted photos on Mac Trash Bin folder. It keeps the deleted files on Mac for 30 days or until someone emptied the Trash before this duration.
Follow the simple steps to recover deleted image files from Mac Trash:
- Click on the Trash icon in dock on Mac to open it.

- Search for deleted image that you want to recover.
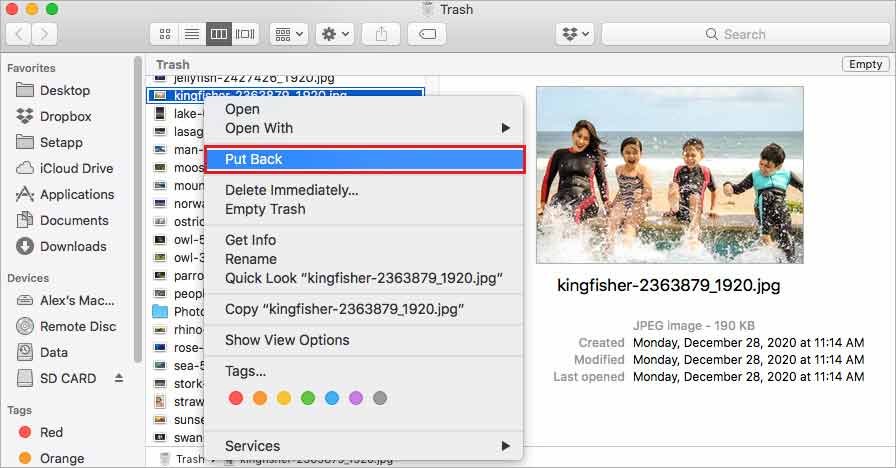
- After you locate the files, right-click on each and select Put Back. The photos will move to their original location.
Method 2: Recover deleted image files using Terminal
Alternatively, you can recover deleted photos from Mac Trash through Terminal, the command-line interface on Mac. The solution is it comparatively difficult and has its limitation. It can recover only one file at a time unlike a recovery software that offers bulk recovery of deleted photos. Further, try this method, only when you know the exact file name of the deleted photo. You have to specify location to save the photos.
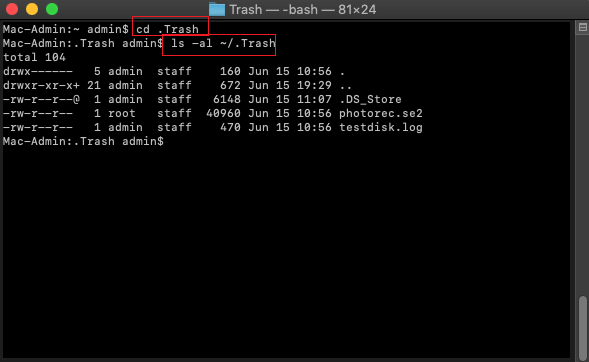
To open Terminal application on Mac, navigate to Applications > Utilities > Terminal. Enter the command line and recover the deleted photo.
Steps to recover deleted photos using Mac Terminal:
- Open the Terminal and type cd. Trash. Click on the Return button.
- Type mv deleted image file name../. Press Return.
- Type Quit and press Enter to close Terminal.
- Now go to the Finder to access your restored photos on Mac.
- Click to know step-by-step how to recover image file from Trash using Terminal on Mac.
Method 3: Recover deleted pictures from Photos App on Mac
If the images are missing from the Photos app on Mac, first check the Recently Deleted album of the application. The Photos app before permanently deleting keeps the pictures in its ‘Recently Deleted’ folder for 30 days.
Further note, if there is no space available on the Mac disk, the pictures may get deleted before the estimated duration. Hence, quickly restore deleted photos on Mac from Photos app by following below steps:
- Open Photos on Mac.
- In the left panel, click on Recently Deleted.
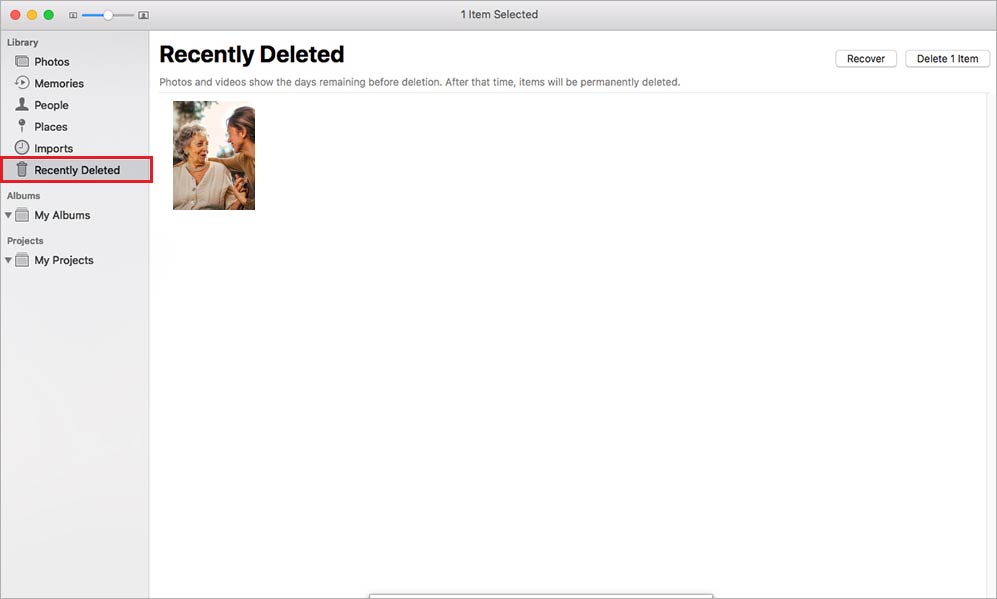
- Select the pictures you want to retrieve. A blue check mark in the corner of the thumbnail shows the photos are selected.

- Click Recover at the upper-right corner. Photos are saved to their original destination.
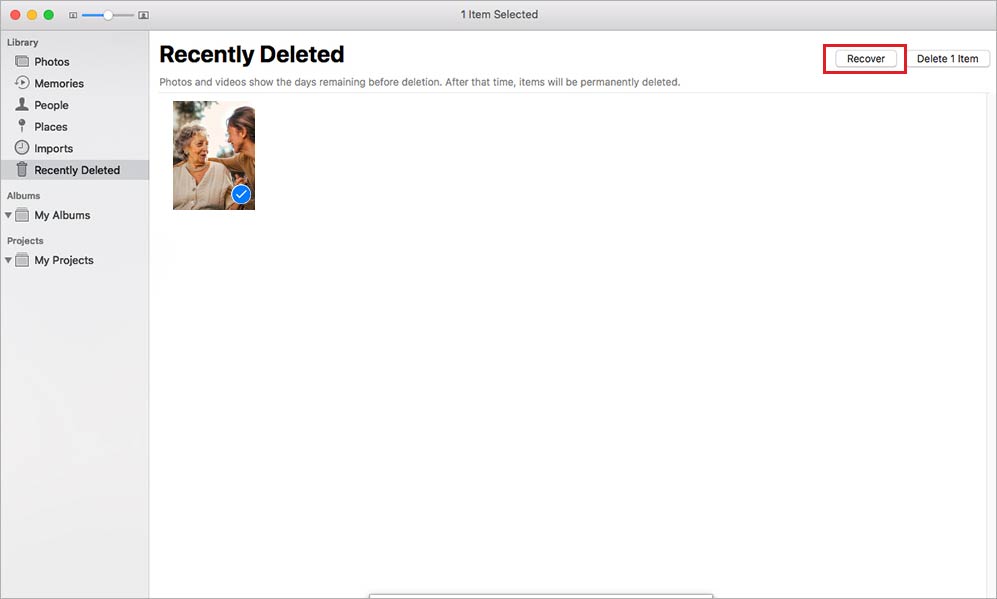
- Once done, exit the ‘Recently Deleted’ section and view your image files in Photos app on Mac.
Method 4: Recover permanently deleted photos on Mac from Time Machine
For those of you who have set up Time Machine to automatically backup files, its easy to recover permanently deleted photos on Mac. In any situation of loss of pictures from Photos Library on Mac, you can restore from Time Machine Backup.
Follow the below steps to get back lost photos from Mac by using Time Machine Backup:
- Open Time Machine on your Mac.
- You will see the local backups list with dates. Find and click on the required backup that contains your photos.
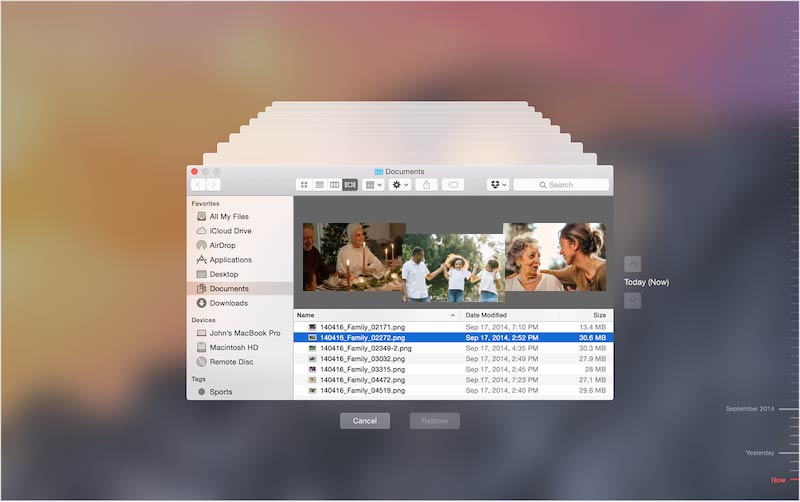
- Click Restore. Wait until the process finishes.
Method 5: Recover deleted photos from Apple iCloud
With photos backed up in the cloud storage, you can relax without worrying about the loss. If you are using Apple’s iCloud service to save and sync your Mac photos across devices, restore the deleted iCloud photos from there.
Here are the steps to restore iCloud Photos:
- In your browser, open icloud.com.
- Log in to your iCloud account using Apple ID and password.
- Click to open Photos icon.

- Click on Albums on top.
- Click on the Recently Deleted option in the sidebar.
- Select the required photos and click Recover on top right.
Method 6: Use a professional Mac photo recovery software
If you cannot restore pictures from Photos app, iCloud, or Time Machine, unfortunately, you have permanently lost them.
The only solution to get back permanently deleted photos on Mac is with the help of a professional Mac photo recovery software, such as Stellar Photo Recovery. The software can recover deleted pictures even in tough data loss situations like formatting, virus attack or drive corruption.
You can retrieve accidentally deleted or lost pictures and other multimedia files from MacBook Air, MacBook Pro, iMac, Mac mini, Mac Pro, etc. The software can also scan and retrieve photos from SD cards, camera memory cards, Time Machine, Mini Disk, Fusion Drive, and other Mac-based storage devices.
To recover your photos on Mac, follow the given steps:
- Download and launch Stellar Photo Recovery for Mac on your system.
- Select the macOS drive from Recover Photo, Audio & Video screen and click Scan.

- You can also use ‘Advanced Settings’ option on the top, if you remember the file format of your photos. Simply click on Add file type to scan for faster and exact results.
- Click Next.

- As the software completes the scanning, a list of scanned files and folders will be listed. Select and preview the photos before saving the recovered photos on Mac.
- Select the pictures you want to restore and click Recover.
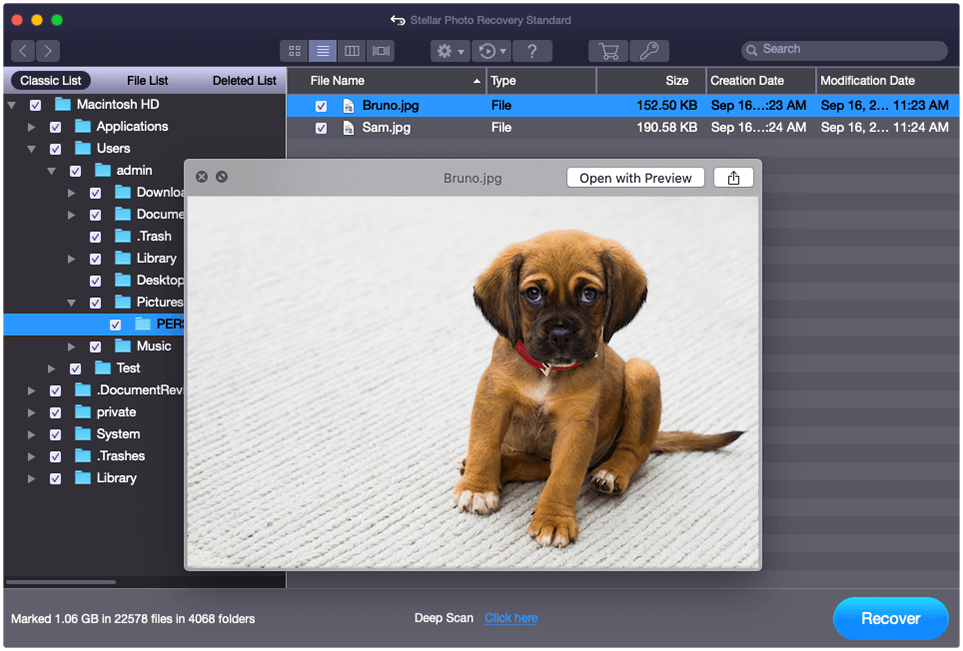
- Specify the location and click Save to save the pictures. Avoid saving the recovered pictures in the same volume or macOS drive from where you lost the photos.
Method 7: Restore image files on Mac with Recovery Mode
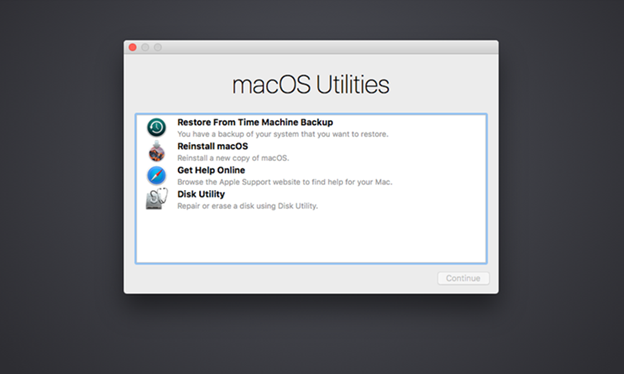
Recovery Mode is a macOS built-in feature. It helps to recover lost or disappeared files due to macOS crash, system errors, third-party software conflict etc. However, this method requires an external drive to save the recovered image files.
You can utilize Recovery Mode to repair corrupt disk drives through Disk Utility and eventually restore its lost data.
To enter Recovery Mode, hold Command+R key until you see an Apple logo. Release the key when the startup screen of Mac boots into macOS Recovery mode appears. Next follow the instructions to recover the lost image files. Click for detailed steps to recover photos by using Recovery mode on Mac.
Wrapping Up
Deleted photo recovery on Mac can be challenging, if you don’t have Time Machine, iCloud, or other backup. Like Windows, on Mac you cannot try recovery through previous versions or system repair. Meanwhile, photo recovery through Recovery Mode on Mac is complicated.
Hence, for data loss from macOS environment, always trust a secure Mac photo recovery software like Stellar Photo Recovery for Mac. The professional software recovers photos of any file format from all kinds of macOS computers and drives.
Nonetheless, remember to take the free trial, which shows the recoverable photos on Mac.


 5 min read


